Azure App Services Configuration
Creating an App with App Service
Users can use Web Apps, Mobile Apps, or API Apps features of Azure App Service to create their own applications through the Azure portal.
Key Points about Configuration Settings
Let’s look at some basic configuration settings required to create an app using App Service.
| Setting | Description |
|---|---|
| Name | The app name must be unique. This name is used to identify and locate the app in Azure. Example: webappces1.azurewebsites.net. Users can also map it to a custom domain if desired. |
| Publish | App Service can publish the app as code or as a Docker Container. |
| Runtime stack | App Service uses a software stack to run the app, including language and SDK version. For Linux apps and custom containers, users can specify optional startup commands or files. Available stacks include: .NET Core, .NET Framework, Node.js, PHP, Python, Ruby. |
| Operating system | The OS for the app's runtime stack can be Linux or Windows. |
| Region | The selected regional location for the app will affect the availability of App Service plans. |
| Pricing plans | The app must be linked to an Azure App Service Plan to define the resources, features, and capacity. Users can select from various pricing tiers based on the chosen region. |
Post-Creation Settings
Once the app is created, additional configuration settings are available in the Azure portal, including deployment options and path mappings.
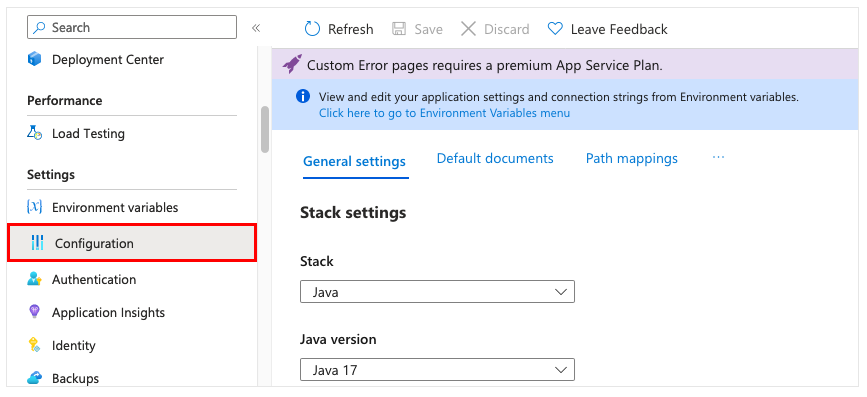
Image Source https://learn.microsoft.com/en-us/training/modules/configure-azure-app-services/3-create-app-service
Some settings can be included in developer code, while others can be configured directly in the app. Here are a few additional app settings:
- Always On: Keeps the app running even when there’s no traffic. Required for continuous WebJobs or those triggered using CRON expressions.
- Session affinity: In multi-instance deployments, ensures that a client's session is directed to the same instance.
- HTTPS Only: When enabled, all HTTP traffic is redirected to HTTPS.
Try hands-on practice with the exercise Create a web app in the Azure portal. This exercise provides a sandbox for safe testing.
Overview of CI/CD with App Service
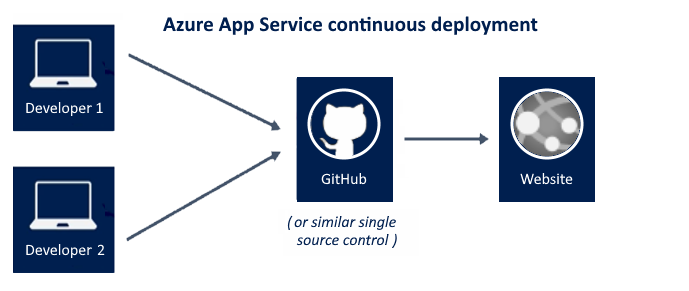
The Azure portal offers built-in integration and continuous deployment with services like Azure DevOps, GitHub, Bitbucket, FTP, or local Git repositories. Users can link a web app with one of these sources, and App Service will handle the rest. Code and future changes will be automatically synced with the web app.
With Azure DevOps, users can also define their own build and release processes: compile source code, run tests, and build and deploy releases to the web app upon each commit. All operations are automated without manual intervention.
Key Points about Continuous and Manual Deployment
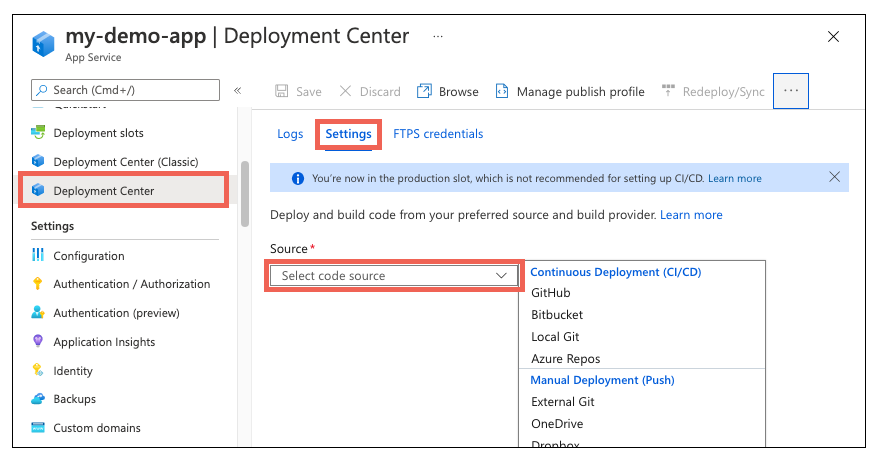
When creating a web app with App Service, users can choose between continuous and manual deployment methods. Consider which method best suits the App Service app. Both options can be managed via the Deployment Center.
Continuous Deployment (CI/CD)
CI/CD is the process of rapidly and repeatedly deploying new features and bug fixes with minimal impact on end users. Azure supports automatic deployment from several sources:
- GitHub: Azure supports automatic deployments directly from GitHub. When the GitHub repository is connected to Azure, any push to the production branch is automatically deployed.
- Bitbucket: Similar to GitHub, Bitbucket can be configured for automatic deployment.
- Local Git: The Web Apps feature of App Service provides a local URL that can be added as a repository.
- Azure Repos: Azure Repos is a version control toolset for managing code. Whether for small or large projects, using version control early on is a smart decision.
Manual Deployment
Manual deployment allows users to push code directly to Azure. Manual deployment options include:
- Git Remote: App Service Web Apps provides a Git URL that can be added as a remote repository. Pushing to this repository deploys the app.
- OneDrive: Microsoft’s cloud storage service allows users to store and share files online with a Microsoft account.
- Dropbox: A cloud storage service that allows users to store and share files online.
Creating a Deployment Slot
When deploying a web app, Linux web app, mobile backend, or API app to Azure App Service, users can use a deployment slot as an alternative to the default production slot.
Key Points about Deployment Slots
Let’s look at key characteristics of deployment slots:
- Deployment slots are live apps with their own hostnames.
- Deployment slots are available in Standard, Premium, and Isolated App Service Plan tiers.
- Each tier offers a different number of deployment slots.
- App content and configuration elements can be swapped between slots, including the production slot.
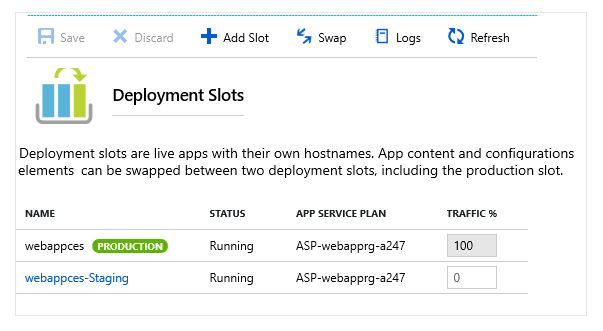
Image Source https://learn.microsoft.com/en-us/training/modules/configure-azure-app-services/5-create-deployment-slots
Considerations When Using Deployment Slots
Using deployment slots provides several benefits for App Service apps. Review the benefits below and consider how they support your implementation:
1. Validate Changes
Users can validate changes in a staging deployment slot before swapping them into the production slot.
2. Minimize Downtime
By deploying the app to a slot first and then swapping it into production, users ensure all app instances are ready. This eliminates downtime during deployment. Traffic is seamlessly redirected, and no requests are lost during the swap. This process can be fully automated by enabling Auto swap, if validation before swap is not required.
3. Rollback to a Stable Version
After a swap, the slot previously used for staging now contains the last production version. If the new deployment is unsatisfactory, users can swap back to restore the last stable version.
4. Use Auto Swap
Auto swap simplifies Azure Pipeline scenarios for continuous deployment without cold starts or downtime for users.
When Auto swap is enabled from a slot to production, every code push to the slot triggers an automatic swap once the app is ready to run in the source slot.
Auto swap is not currently supported for Web Apps on Linux.
Adding a Deployment Slot
Deployment slots are configured via the Azure portal. Users can swap app content and configuration elements between slots, including the production slot.
Key Points about Creating Deployment Slots
Here are some important notes about configuring deployment slots:
- New deployment slots can be either empty or cloned from another slot.
- Slot settings are grouped into three categories:
- Slot-specific app settings and connection strings (if applicable).
- Continuous deployment settings (if enabled).
- Azure App Service authentication settings (if enabled).
When cloning from another slot, cloned configurations can be edited. Some configuration elements move during a swap, while slot-specific settings remain in the original slot.
Swappable vs. Slot-Specific Settings
The table below shows which settings move during a swap and which remain specific to their slot:
| Swappable Settings | Slot-Specific Settings |
|---|---|
| Language stack & version, 32/64-bit | Custom domain names |
| App settings * | Private certificates and TLS/SSL settings |
| Connection strings * | Scaling settings |
| Mounted storage accounts * | Always On |
| Public certificates | IP restrictions |
| WebJobs content | WebJobs scheduler |
| Hybrid connections ** | Diagnostic settings |
| Service endpoints ** | CORS (Cross-origin resource sharing) |
| Azure CDN ** | Virtual network integration |
| Path mapping | Managed identities |
* Some settings can be configured as slot-specific
** These features are not currently available
Deployment slots allow users to deploy apps more flexibly, validate changes, and minimize downtime during release. Be sure to review the relevant settings for your app’s needs.
Securing App Service
Azure App Service provides built-in support for authentication and authorization.
Users can enable user login and access data with minimal or no code changes to the web app, API, mobile backend, or even Azure Functions apps.
Authentication and Authorization Security
Secure authentication and authorization require a deep understanding of security — including federation, encryption, JWT management, grant types, and more. App Service provides these utilities so users can focus on delivering business value to customers.
Using Azure App Service for authentication and authorization is not mandatory.
Many web frameworks include security features, and users are free to use the solution of their choice.
Key Points about App Service Security
Here’s how App Service helps secure applications:
-
The security module for authentication and authorization runs in the same environment as the app code, but separately.
-
This module is configured through app settings — no SDKs, specific programming languages, or code changes are needed.
-
The security module handles several tasks:
- Authenticating users with configured providers.
- Validating, storing, and refreshing tokens.
- Managing authentication sessions.
- Injecting identity info into request headers.
Considerations for Using App Service for Security
Authentication and authorization settings are configured via the Azure portal. Available options include:
- Allow Anonymous Requests
- No authorization action from App Service.
- App Service simply forwards authentication info in the HTTP header for authenticated requests.
- Suitable for high flexibility — e.g., offering multiple login options for users.
- Require Authenticated Requests Only
- All anonymous requests are redirected to:
/.auth/login/(provider) - Effectively behaves like "Login with (provider)".
- If anonymous requests come from native mobile apps, a HTTP 401 Unauthorized is returned.
- No authentication code needs to be written in the app.
This option restricts access to all application endpoints. If public pages (like a homepage) are needed, consider the implications carefully — especially for SPA (single-page applications).
- Logging and Tracing
- Users can view authentication and authorization logs directly in application log files.
- If unexpected authentication errors occur, users can view full details in the app logs.
- With failed request tracing enabled, users can see how the security module contributed to a failed request.
- Look for references to
EasyAuthModule_32/64in trace logs for more insight.
Azure App Service makes it easy to implement advanced security without heavy coding, allowing users to build reliable and secure apps more efficiently.
Creating a Custom Domain Name
Custom domains are domain names that you own and configure to point to your app hosted in Azure, replacing the default Azure domain.
Example:
- Default Azure domain:
myapp-00000.westus.azurewebsites.net - Custom domain:
www.contoso.com
Benefits of Using a Custom Domain
- Provides a branded, easy-to-remember web address.
- Increases trust and credibility with users.
- Allows better management and security of app traffic.
Steps to Create a Custom Domain Name
Creating a custom domain requires information about domain providers, security, and naming.
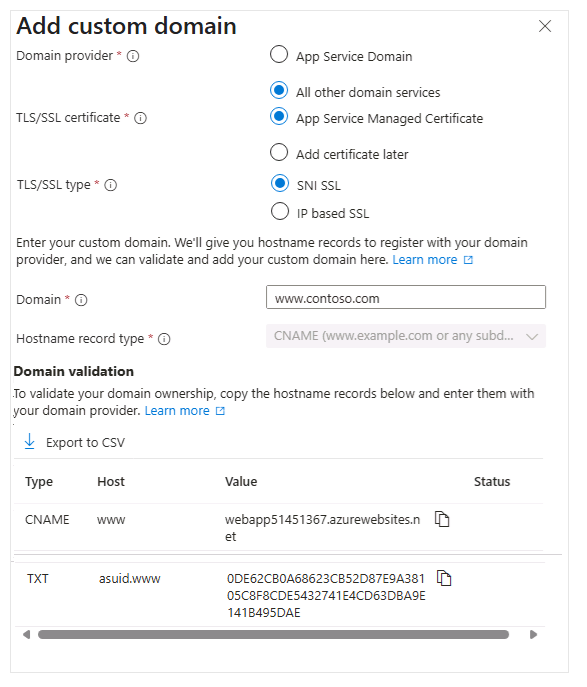
Image Source https://learn.microsoft.com/en-us/training/modules/configure-azure-app-services/8-create-custom-domain-names
1. Reserve a Domain Name
The easiest way is to purchase a domain directly from the Azure portal. This domain will not be in the format *.azurewebsites.net.
The advantage is that you can manage the domain directly from the Azure portal without using a third-party website.
2. Create DNS Records
DNS (Domain Name System) uses record data to map domain names to IP addresses. For web apps, you can use:
- A record: Maps the domain name to a specific IP address.
- CNAME record: Maps the domain name to another domain name.
📝 Example:
You can mapwww.contoso.comtowebapp.azurewebsites.net.
- If the IP address changes, CNAME stays valid, but A records must be updated.
- Some registrars don’t allow CNAMEs for root domains (e.g.,
contoso.com). In that case, you must use an A record.
3. Enable the Custom Domain
After you own the domain and create the DNS record:
- Use the Azure portal to validate the custom domain.
- Add the domain to your web app.
- Be sure to test the domain before publishing your app.
With a custom domain, you can present a professional appearance and enhance user experience on Azure App Service.
Backup and Restore App Service
The Backup and Restore feature in Azure App Service lets you back up your app manually or on a schedule.
Backups can be kept for a limited time or indefinitely. You can restore your app to a previous state, either overwriting current content or restoring to a different app or site.
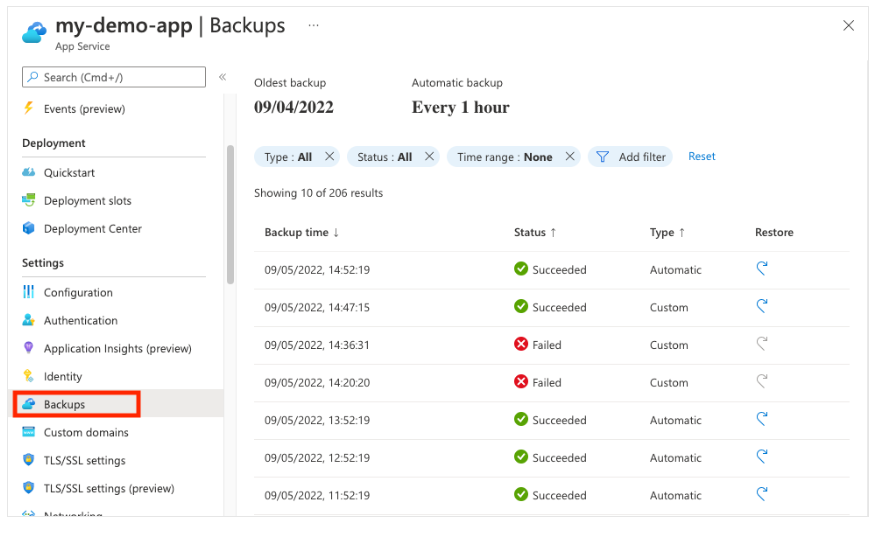
Image Source https://learn.microsoft.com/en-us/training/modules/configure-azure-app-services/9-backup-app-service
Key Considerations for Backup and Restore
Here are important points about the Backup and Restore feature in Azure App Service:
- This feature is only available on the Standard or Premium App Service Plan.
- You need an Azure storage account and container within the same subscription as the app.
- Data that can be backed up includes:
- App configuration settings
- File content
- Connected databases (e.g., Azure SQL, Azure Database for MySQL, PostgreSQL, MySQL in-app)
- Backup File Format
Each backup includes:
- A
.zipfile: contains the backed-up data. - An
.xmlfile: the manifest or contents list of the.zipfile.
- Types of Backup
- Full backup (default): includes all files, settings, and databases.
- Partial backup: you can specify files/folders to exclude from the backup.
- Backup Capacity
- The maximum size per backup is 10 GB, including app files and databases.
- Backup Access
- Backups can be viewed on the Containers page in the storage account via the Azure portal.
Considerations
1. Use Full Backup
A full backup ensures that all settings, files, and databases are saved.
When restoring, the entire site content will be replaced. Files not included in the backup will be deleted.
2. Use Partial Backup
If you only want to back up part of your app, you can use a partial backup.
Excluded files/folders won't be backed up or restored.
3. Review Backup Files
You can manually open the .zip and .xml files to inspect backup contents without restoring the app.
4. Check Firewall on Backup Destination
If your storage account uses a firewall, it cannot be used as a backup destination.
With Backup and Restore, you can ensure your app's reliability and security against system failures or user errors,
and easily restore it to a previous state.
Using Azure Application Insights
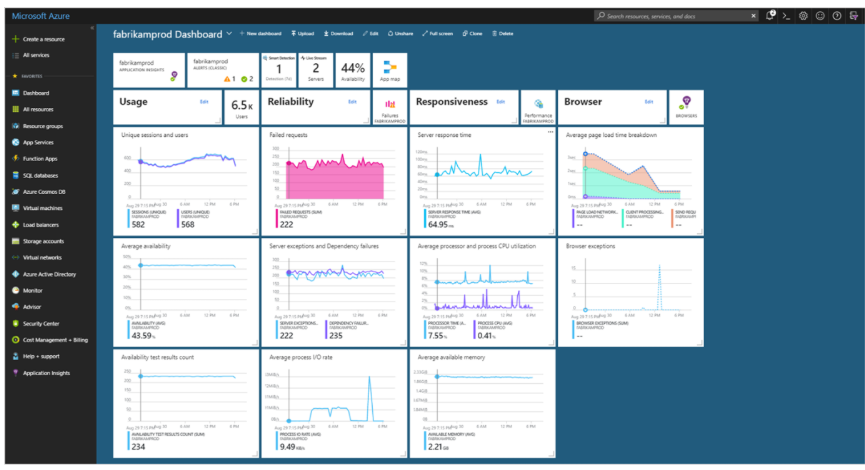
Image Source https://learn.microsoft.com/en-us/training/modules/configure-azure-app-services/10-use-application-insights
Azure Application Insights is a feature of Azure Monitor that allows you to monitor live-running applications.
You can integrate Application Insights with Azure App Service to automatically detect performance anomalies.
This feature is designed to help you continuously improve your app's performance and usability.
Application Insights offers powerful analytics tools to diagnose issues and understand how users interact with your app.
📊 The diagram shows Azure Application Insights receiving data from web pages, client apps, and web services,
which is then sent to Alerts, Power BI, and Visual Studio.
Key Features of Application Insights
Here are some characteristics of Application Insights:
- Supports multiple platforms like .NET, Node.js, and Java EE.
- Can be used for apps hosted on-premises, hybrid, or in public cloud.
- Integrated with Azure Pipeline processes and supports many development tools.
- Can monitor and analyze data from mobile apps via integration with Visual Studio App Center.
Considerations When Using Application Insights
Application Insights is ideal for supporting development teams. It helps understand app performance and usage.
Here are some metrics you can monitor:
| Metric | Description |
|---|---|
| Request Rate, Response Time, and Failure Rate | Identify popular pages, peak access times, and user locations. Spot issues when response time or failure rate increases with high traffic. |
| External Service Dependencies | Monitor dependency levels and failures from third-party services affecting app performance. |
| Exceptions | Analyze aggregate statistics or review specific cases with stack traces. Capture exceptions from both server and browser sides. |
| Page Views and Load Performance | Collect page views and load performance data from user browsers. |
| User and Session Counts | Track the number of users and active sessions connected to the app. |
| Performance Counters | Add performance counters from Windows/Linux servers to monitor CPU, memory, and network usage. |
| Host Diagnostics | Integrate diagnostics from Docker or Azure into Application Insights. |
| Diagnostic Trace Logs | Use trace logs to correlate events with requests and diagnose issues. |
| Custom Events and Metrics | Write custom events/metrics on client or server side. Example: item sales count, game wins, etc. |
Consider diving deeper with the Troubleshoot solutions with Application Insights learning module on Microsoft Learn.
Benefits of Using Azure App Service
There are many advantages to using App Service to develop and deploy web, mobile, and API applications.
Refer to the table below and consider which features can help you host your App Service instances.
| Benefit | Description |
|---|---|
| Multiple Languages and Frameworks | App Service has first-class support for ASP.NET, Java, Node.js, PHP, and Python. You can also run PowerShell scripts and other executables as background services. |
| DevOps Optimization | App Service supports CI/CD with Azure DevOps, GitHub, BitBucket, Docker Hub, and Azure Container Registry. Promote updates through test and staging environments. Manage your app with Azure PowerShell or cross-platform CLI. |
| Global Scalability with High Availability | App Service helps you scale manually or automatically, both vertically and horizontally. Host apps anywhere on Microsoft’s global datacenter infrastructure, with high availability via SLA. |
| Connectivity to SaaS and On-Prem Data | Choose from 50+ connectors for enterprise systems (like SAP), SaaS (like Salesforce), and internet services (like Facebook). Access on-premises data via Hybrid Connections and Azure Virtual Networks. |
| Security and Compliance | App Service meets ISO, SOC, and PCI standards. Authenticate users with Microsoft Entra ID or social logins like Google, Facebook, Twitter, or Microsoft. Restrict IPs and manage service identities. |
| App Templates | Choose from a wide range of app templates in the Azure Marketplace, including WordPress, Joomla, and Drupal. |
| Visual Studio Integration | App Service includes Visual Studio tools to simplify building, deploying, and debugging apps. |
| API and Mobile Features | App Service supports out-of-the-box CORS for RESTful APIs. Simplify mobile scenarios with authentication, offline sync, push notifications, and more. |
| Serverless Code | Run snippets of code or scripts on demand without explicitly provisioning or managing infrastructure. Pay only for the compute time your code actually uses. |